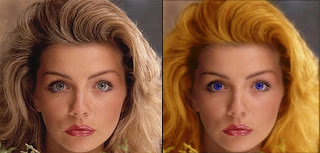
In our next lesson we learnt about airbrushing, changing eye colour and hair colour. To do this we opened up our image in Adobe Photoshop elements. First we duplicated our original image then applied a Gaussian blur to that image, this blur varies depending on the image you work on, and for the above image my blur was around 28 pixels. Once you have blurred it, you then erase the eyes, the eyebrows, the mouth etc… to make sure they don’t look wrong. The blur is to remove blemishes and make the skin look clean.
Once you have done this first step, you then work on the eyes. For this you open up a new layer then cover over the eyes in your desired colour. Once you have gone over the eyes you change the layer affect to soft light, change the opacity down to around 60 or 70. Then you erase any areas of this that may have gone over the actual eye to make it look more real. You then can apply a Gaussian blur to this to make it more real.
The same steps are taken for the hair.
Once you have done this you get your final image.


No comments:
Post a Comment